Where a sloped roof meets a stucco wall, water doesn’t simply run off harmlessly. Without proper flashing details, runoff can channel behind the siding and into wall cavities, triggering rot, mold, and structural damage that costs thousands to repair. Orange County’s stucco-clad homes face this risk at every roof-to-wall intersection, yet many properties lack the components needed to manage water safely.
Kick-out flashing diverts roof runoff into gutters before it reaches the wall, preventing water from slipping behind stucco and compromising your home’s envelope. This small metal or plastic piece, required by building code, works alongside step flashing and proper underlayment to protect vulnerable junctions. Your home’s long-term durability depends on getting these details right during installation or repair.
This article walks through how these intersections function, what goes wrong when flashing fails, and the installation standards that apply to your region. You’ll also learn what a thorough flashing inspection should cover and how local climate patterns influence design choices for stucco homes across Garden Grove and Orange County.
Roof-To-Stucco Intersections Explained
Where your roof meets a stucco wall, multiple layers of flashing, drainage components, and barriers work together to channel water away from framing and sheathing. Each element serves a specific function in protecting the building envelope from moisture intrusion.
Step Flashing and Counterflashing Roles
Step flashing consists of individual metal pieces installed in a staggered pattern along the roof-wall intersection. Each piece tucks under a shingle course and extends up the wall behind your water-resistive barrier. This creates a shingled effect that directs water down and away from the joint.
The pieces typically measure 4-10 inches in width and extend 2-4 inches onto the roof deck. They overlap each other by at least 3 inches to prevent water from slipping between joints. Galvanized steel or aluminum are common materials that resist corrosion in coastal Orange County conditions.
Counterflashing integrates into your stucco exterior by embedding into the wall assembly. It covers the top edge of the step flashing while allowing water to drain over it. This two-layer approach provides redundancy—if water penetrates the stucco, the counterflashing acts as a backup barrier that directs moisture onto the step flashing below rather than into your OSB sheathing or framing.
Stucco Weep Screeds and Drainage Planes
A weep screed attaches at the bottom of your stucco wall where it meets the roof plane. This metal component creates a physical gap—typically 1-2 inches—between the stucco finish and the roofing underlayment. The gap allows water that enters behind the stucco to exit freely rather than pooling against framing members.
Your drainage plane sits behind the stucco layers, usually formed by the weather-resistive barrier (WRB) or building paper. This plane must remain continuous from the wall down to the weep screed. Water that reaches this layer follows gravity downward and exits through the weep holes.
Proper weep screed installation requires:
- Minimum 1-inch clearance above finished roofing
- Secure fastening to wall framing or sheathing
- Continuous bead of sealant where it meets flashing
- Unobstructed weep holes
EIFS systems use a different approach with integrated drainage mats, but the principle remains the same: moisture must have an exit path.
Water Pathways Behind Cladding Systems
Water follows multiple routes through a roof-wall intersection. Wind-driven rain can penetrate stucco cracks and reach your water-resistive barrier. Roof runoff travels down shingles and hits the step flashing, which redirects it toward the drip edge. Condensation can form on the back of stucco during temperature swings.
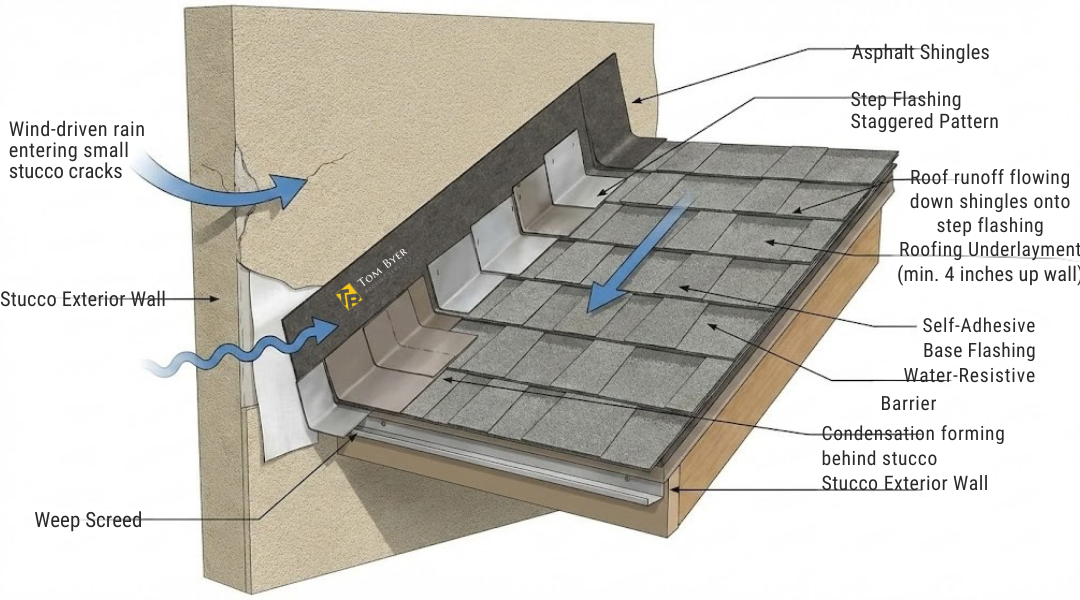
Your roofing underlayment—whether felt paper or self-adhesive flashing—creates a secondary barrier on the roof deck. It must extend up the wall behind the step flashing by at least 4 inches. Liquid flashing or peel-and-stick membranes often seal the inside corner before metal flashing installation.
The base flashing layer (the first piece of self-adhesive flashing folded into the corner) catches water that bypasses upper components. This redundancy matters because no single layer is perfect. Proper installation sequences these layers so water cannot migrate upward through capillary action or behind barriers through gaps in the assembly.
Kick-Out Flashing Function and Failure Patterns
Kick-out flashing serves as the critical junction piece where your roof ends against a wall, redirecting water into gutters rather than behind siding. Missing or poorly sized kickout diverters account for some of the most common and costly leak patterns in Orange County tract homes.
Directing Runoff Into Gutters
Kick-out flashing redirects roof runoff away from the wall and into your gutter system. Without this metal flashing component, water sheets down the roof plane and flows directly behind your stucco wall cladding instead of entering the downspout.
The flashing must extend far enough from the wall to catch all runoff from the roof slope above. It needs to be angled and shaped to channel water into the gutter opening without overflow or bypass. Proper kickout flashing creates a bridge between the last piece of step flashing and the gutter entrance.
Most effective installations use corrosion-resistant flashing materials such as galvanized steel, aluminum, or copper. The metal must be sized to your roof pitch—steeper roofs generate faster runoff and require larger diverters to handle the volume.
Common Omissions in Tract Construction
Many Orange County tract homes built in the 1990s and 2000s lack kickout flashing entirely. Builders often relied on step flashing alone, leaving the critical roof-to-gutter transition unprotected.
You’ll find this omission most frequently where a single-story roof terminates at a two-story wall. In other cases, framers installed gutters but never added the kickout diverter to connect the roof plane to the gutter system. Some builders substituted sealant or caulk instead of proper flashings, which fails within a few years due to thermal movement and UV exposure.
Inspecting your home’s exterior corners where roofs meet walls will reveal whether previous builders skipped this essential component. Look for water stains, paint peeling, or efflorescence on stucco below these junctions as evidence of missing flashing materials.
Consequences of Undersized Diverters
Undersized kickout flashing cannot handle the volume of roof runoff during heavy rains, causing water to overflow behind your stucco. Even when present, many diverters are too short, too narrow, or improperly angled to capture and redirect all water flow.
Water that bypasses the gutter soaks the wall framing, leading to wood rot in studs, headers, and sheathing. You won’t see interior damage immediately—stucco masks moisture intrusion for years until structural rot becomes severe. By the time stains appear on interior walls, you’re facing repairs costing thousands of dollars.
Properly sized kickout diverters must account for your roof area, pitch, and local rainfall intensity. A diverter adequate for a 4:12 pitch may fail on a 6:12 pitch with the same square footage above it.
Climate and Construction Norms in Orange County, California
Orange County’s Pacific storm systems drive rain horizontally against wall-roof intersections, while building code variations across its 35 jurisdictions create inconsistent retrofit standards for exterior cladding and flashing details.
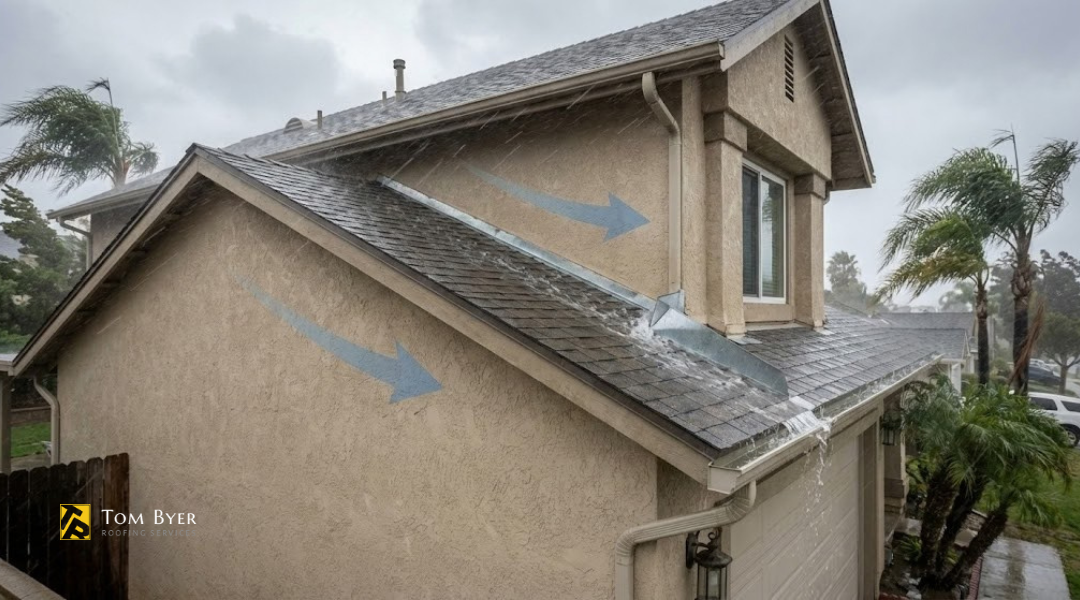
Wind-Driven Rain During Pacific Storms
Pacific storms approaching Orange County from the southwest generate wind-driven rain that hits vertical surfaces with significant force. Your stucco walls face sustained exposure during these weather events, particularly where rooflines terminate against exterior cladding. Water doesn’t simply run down the wall—it moves laterally into gaps and seams.
The International Residential Code acknowledges this threat through prescriptive flashing requirements, but California Title 24 adds climate-specific provisions for moisture management. Without properly installed kick-out flashing, water tracks behind your siding and saturates the wall cavity. You’ll see staining on interior drywall or develop mold within framing members before exterior damage becomes visible.
Building code compliance in Orange County requires continuous water management from roof surface to gutter system. The transition point where your roof meets stucco creates the highest risk zone during storms.
Overhang Depth and Wall Exposure
Roof overhang depth directly affects how much rain reaches your wall-roof junction. Minimal or absent overhangs—common in modern architectural styles—leave stucco walls fully exposed during storms. Your exterior cladding receives direct water contact rather than protection from projecting eaves.
Homes with 12-inch or greater overhangs redirect most rainfall away from walls. Properties with 6-inch overhangs or less experience persistent wetting at the transition zone. This matters because kick-out flashing and step flashing must handle higher water volumes when overhangs don’t provide initial diversion.
The relationship between overhang and flashing design affects your long-term maintenance costs. Shallow overhangs demand more robust waterproofing at the roof-wall interface and more frequent inspection schedules.
Retrofit Limits in Finished Stucco Assemblies
Retrofitting proper flashing into existing stucco walls presents significant challenges. You cannot access the wall cavity without removing exterior cladding, and partial demolition often reveals water damage that extends the scope of repairs. Orange County’s 35 different jurisdictions apply varying standards for this retrofit work.
Compliance with current building code during retrofit requires exposing the water-resistive barrier behind your stucco. This means cutting back siding material at least 6 inches above the roofline to install new kick-out flashing and integrate it with existing wall layers.
Cost considerations escalate quickly:
- Stucco removal and patching
- WRB repair or replacement
- New flashing fabrication and installation
- Color-matched stucco finish work
Limited access often prevents full compliance with newer International Residential Code provisions for preventing water intrusion, forcing you to balance code requirements against practical constraints in finished assemblies.
Field Observations from Tom Byer Roofing Service in Garden Grove
After decades of roofing work across Orange County, the team at Tom Byer Roofing Service has documented patterns in how stucco-to-roof junctions fail. Most leak calls trace back to three specific installation gaps: poorly terminated eaves, disconnected flashing systems between trades, and confusion over whether visible damage signals active intrusion.
Recurring Leak Origins at Eave Terminations
The transition where step flashing ends and gutters begin creates the most common failure point in stucco homes. Without a kick-out flashing to bridge this gap, water running down step flashing hits the wall instead of entering the gutter. This creates water stains on interior ceilings and visible peeling paint on exterior stucco.
Tom Byer Roofing Service crews find that approximately 70% of stucco-related roof leaks involve missing or improperly installed kick-out flashings at eave terminations. The problem worsens when gutters sit too low or too far from the wall, leaving a gap where water freely enters the wall cavity. Even high-quality roofing materials fail when water bypasses the intended drainage path at this critical junction.
Interface Gaps Between Trades
Coordination failures between roofers and stucco contractors frequently create vulnerability to water intrusion. Roofers install step flashing expecting it to extend behind the wall cladding, while stucco applicators may terminate their scratch coat before reaching the flashing edge. This leaves a visible gap where wind-driven rain penetrates.
The Garden Grove team documents cases where counter-flashing was never installed over step flashing because neither trade claimed responsibility for it. They also encounter situations where stucco was applied directly over flashing without proper weep screeds, trapping moisture intrusion behind the wall with no escape route. These trade gaps appear most often in tract home construction where scheduling pressures limit coordination.
Interpreting Moisture Damage Versus Active Intrusion
Moisture damage inside a wall cavity does not always mean water currently enters the structure. Tom Byer Roofing Service inspectors check for active water intrusion by examining staining patterns, wood moisture content, and whether damage corresponds to recent weather events. Old water stains with dry framing often indicate a leak that was already fixed or self-sealed through caulk expansion.
Fresh damage shows darker discoloration, soft sheathing, and visible dampness within 24-48 hours of rain. Inspectors also look for rust staining on nails and flashing corrosion as indicators of long-term exposure versus one-time events. This distinction matters because it determines whether immediate flashing replacement is necessary or if monitoring suffices.
Design Tradeoffs and Long-Term Implications
Choosing flashing systems for stucco homes involves balancing aesthetic preferences against waterproofing effectiveness, with decisions made during construction determining whether future repairs remain simple fixes or require costly invasive work. Orange County’s climate and architectural trends create specific scenarios where upfront investment in proper detailing pays off over decades.
Minimalist Rooflines Versus Water Control Redundancy
Clean rooflines with minimal visible flashing appeal to homeowners who prefer modern aesthetics, but eliminating redundant water barriers creates risk at stucco-to-roof transitions. A single-layer approach relying only on caulk at these junctions will fail within five to ten years as thermal expansion and UV exposure degrade the sealant. Your home needs multiple overlapping protection layers.
Proper systems layer step flashing with kick-out diverters, then integrate thermoplastic polyolefin or similar membranes behind the stucco to prevent water intrusion even if the outer seal fails. DryFlekt and comparable products provide this hidden secondary barrier without visible hardware. The tradeoff is higher material and labor costs during installation, typically $400 to $800 more per roof-wall intersection compared to basic approaches.
Skipping redundancy to save money or preserve sleek lines means accepting that even minor flashing damage can allow moisture behind your stucco, where it spreads undetected until interior staining or structural rot becomes visible.
Repairing Exterior Finishes Versus Invasive Correction
When kick-out flashing is omitted or fails, water penetrates behind stucco and damages sheathing before you notice exterior symptoms. Fixing this requires removing sections of stucco to access framing, replacing rotted wood, installing proper flashings, and then patching stucco to match existing texture and color—a process costing $3,000 to $12,000 depending on damage extent.
Early repairs addressing only surface issues like resealing joints with caulk cost $200 to $500 but leave underlying problems untouched. These stopgap measures buy one to three years before invasive work becomes unavoidable. Your decision to address flashing properly during initial construction or reroof projects eliminates this cycle.
Stucco patching rarely achieves perfect color and texture matches with aged surfaces, leaving visible repair zones that affect curb appeal and resale value even after moisture problems are resolved.
Preventive Detailing Versus Deferred Remediation
Installing comprehensive flashing during new construction or roof replacement costs 15 to 25 percent more than basic code-minimum approaches, but prevents 90 percent of roof-wall leak failures over the building’s life. Deferring proper detailing shifts costs to future remediation that typically runs three to five times higher than preventive installation.
Orange County’s mild climate means leaks may develop slowly, with damage accumulating for years before becoming obvious. By the time stains appear on interior walls, you often face repair bills exceeding $8,000 to address hidden rot and mold. Preventive systems using kick-out flashing, continuous water-resistive barriers, and proper lap sequences keep water outside the building envelope where it belongs.
Your choice to invest upfront or gamble on deferred maintenance determines whether your stucco home provides decades of trouble-free service or requires periodic expensive interventions to address preventable water damage.